Saturday 31 December 2011

Club Night 28th December

As a mid week, post-Christmas game Luke, Duncan and I decided to play a flames of war desert game. Duncan has been reworking his Germans to suit early war as well as mid, but only had tanks done, so we played 3,000 points, with me using my army I have been using against Luke in the axis of attack game to provide the infantry and he provide the Axis armour. Against this Luke fielded a Crusader company. We played the desert dust up scenario from Hellfire and back.

Luke started with his artillery, infantry and machine guns on table, while I dug in my infantry around our objective. The German armour then began a head on attack on the British positions, pressing them hard, and demonstrating the difference between the quality of the tow Axis nations vehicles as Luke struggled to knock them out.

As the Germans pushed centrally and my Italians dug themselves deeper in around our objective we could see the reserves could be decisive. And here we had the luck, a few British tanks turned up but had to manoeuvre around the wadi, bringing them towards the centre of the board, in range of the anti-tank guns and German armour. By the time the rest arrived it took so long to get into position it was too late as on the other flank the Italians had won it.

The Italian reserves hurried on in the opposite corner and despite casualties pushed on towards the objective, managing to overrun the machine gun platoon. Once again the L3 tankettes proved their worth. Finally the demolisher platoon pushed on to the objective, only to have their commander gunned down, but we then discovered he was an unknown hero and I could now pass my motivation on a 2+, which I did, hanging in there to claim the objective and victory for the Axis forces.

Friday 23 December 2011

Club Night 23rd December

As it was almost Christmas and finish work early day so I headed up early with Steve K to meet Luke and play some early war desert games as it has been a while. Also the club has juts bought the desert fort and we were keen to try it out.

Our first game had me take a Compagnia Mitraglieri of two platoons, with a fort, an AT platoon, and a cannon battery with a Meharisti platoon and Autosahariana platoon in support, fighting a withdrawal against a British rifle company.

This first game did not go well. Attacking under darkness I could not see the British until they assaulted the fort and pushed me back and almost out twice, while on the other flank they took the objective without me even seeing they were there! My poor deployment had exacerbated some poor dice rolls and lead to my quick defeat, still at least it was early and there was time for more games.

The second game saw my force unchanged, while the British gave up their artillery and took a pair of Matildas. This was going to be an issue as I had a slim chance of bailing them out if they exposed a flank to my 75s, otherwise I could not hurt them. Playing a hold the line scenario I decided to use my fort to make an issue of the game by deploying it quite far forward in to no-mans land and forcing them to pass close to it to get to the objectives.

Despite the sneaky Brits again trying to creep forward under nightfall, there must have been more moonlight as I clearly saw them and demonstrated the power of massed machine guns, even in the hands of the poorly trained Libyans as my opening volley reduced one platoon to two stands which ran away and damaged the other, which subsequently tried to assault the fort but was eventually defeated too.

To the left of the fort the armour moved forward with impunity with infantry support to encounter an ambush Mitraglieri platoon which forced the infantry to stop and dig in for survival, but made no difference to the tanks which continued there relentless advance. Again and again they assaulted the infantry driving them back so they became intermixed with the anti-tank guns and the Meharist, but although I was able to deny them the objective I could not stop their attack.

However on the other flank the Autosahariana rushed forward, speeding up as dawn broke and swept into the British rear decimating their support unit and breaking the enemy before the tanks could drive off the massed infantry trying valiantly to hold the objective on the other side.

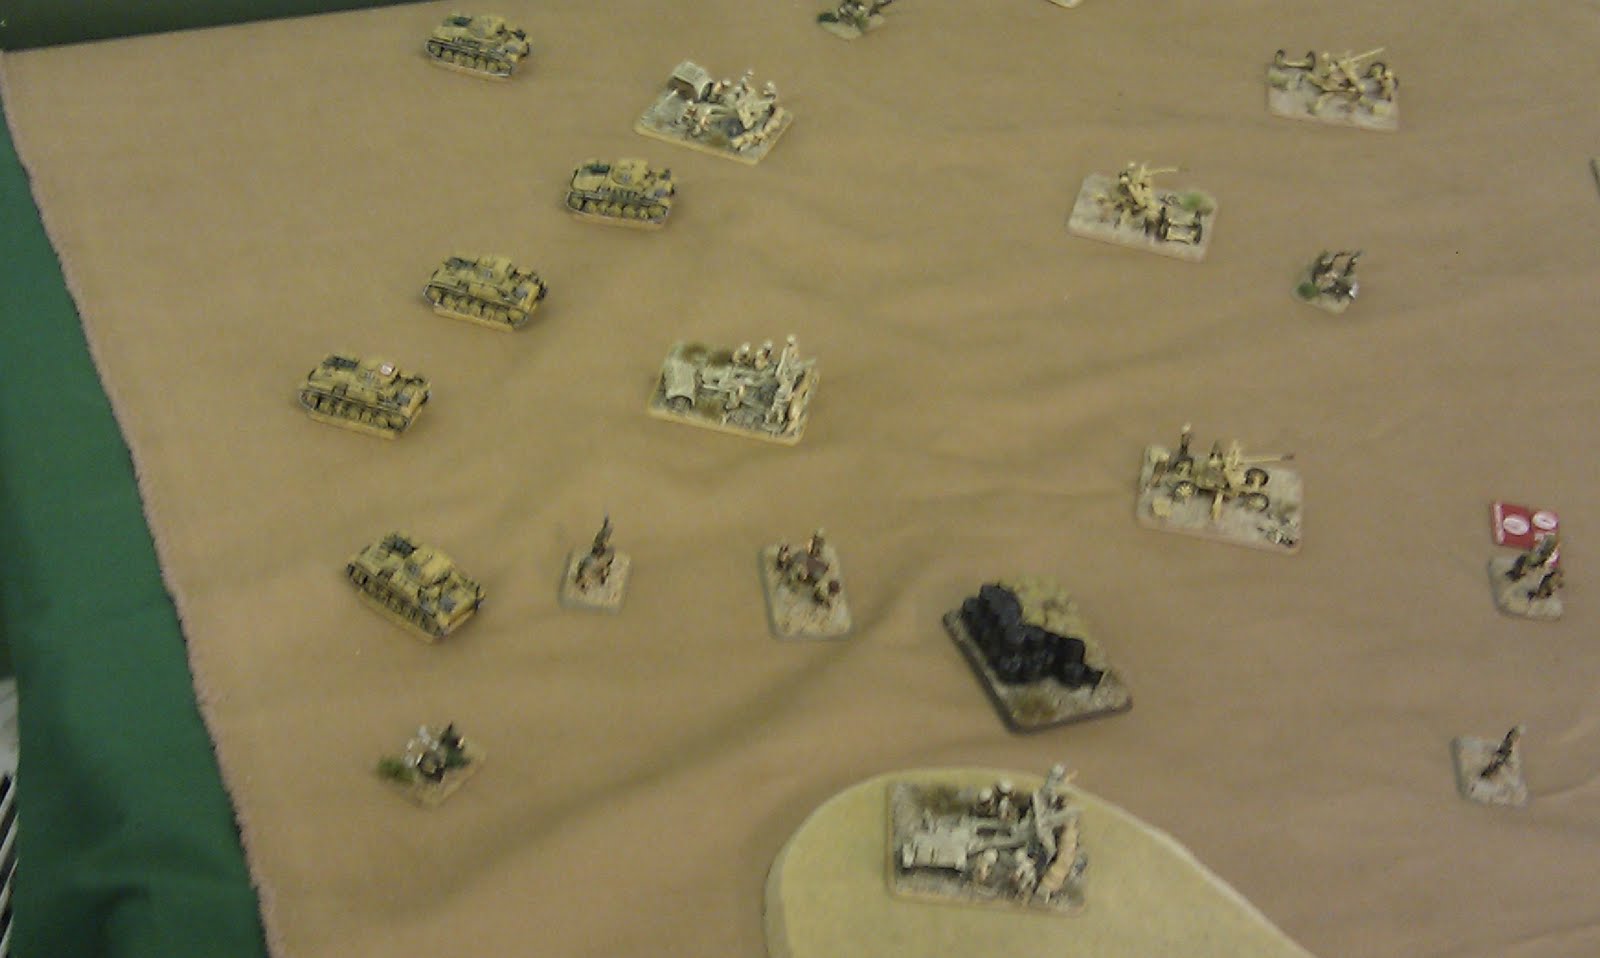
One game all and time for a final game. A total change this time as Steve and Luke took an Australian Divisional Cavalry squadron while I took a Positione Fucilerito try something different. And as we found ourselves playing an encounter battle this could be tough for me, as although me defences might make it easy to deny the enemy victory, pushing forward to take an objective for the win could prove tricky.

After a couple of false starts I think I deployed my fortifications legally with one platoon covering each side of the table and a cannon battery covering one objective on one flank and the howitzers on the other flank. And it began to go wrong immediately. The howitzers were pinned by the enemy artillery and for the rest of the game repeatedly failed to unpin and also eventually lost three guns to the fire as well. But worse was to occur on the other flank. The armoured cars had recce'd forward and then dashed in and assaulted the cannon battery. With 8 shots against lightly armed vehicles I felt confident and then missed with 7 shots, lost the assault and fell back being wiped out in the process.

I now needed to do something decisive. My 47mm gun nest covering the objective destroyed the pesky armoured cars, but my force had still taken a big hit. And armoured forces still streamed forward on that flank to try and take the objective. Fortunately my trusty L3's turned up on that flank and the Solthum armed tank proceeded to knock out a vehicle a turn until overwhelmed by the sheer amount of fire. By now I had also managed to get a mortar platoon deployed in the trenches abandoned by the cannon battery but they got pinned down and remained so for the rest of the game, but somehow managed to survive when numerous vehicle trying to get at them got stuck trying to pass over the gun-pits also vacated by the cannon battery.

On the other flank my 3 tankettes had arrived and proceeded to bombard the Australian Vickers machine guns and to my surprise caused heavy casualties. Behind them the demolisher platoon crept forward taking lighter causalities than expected from the surviving enemy machine guns. Eventually however the tanks strayed within range if the 25 pounder and met their inevitable end, but by now the engineers had got close enough to assault and wipe out the machine guns.

They were not quite close enough to the objective though and had to move forward and brave a turn of enemy fire. Everything engaged them, Bofors guns, infantry, 25 pounders, even the 2-in-C in his MkIV tried to dash across but ended up out of range. It was now time for dice to turn in my favour. Despite the mass of fire I lost my last rifle base, and even the platoon command was hit, but decided he was an unknown hero, so remained, and improved the chances of the platoon hanging in there, which they did.

All that was left was for him to pass his last man check at the start of my turn and victory was mine! I nervously rolled the dice, but the fickle gods of luck where back with me and I managed to make it 2-1 to the Italians. A great afternoon of dashing about in the blue (or in the case of my Italians, finding a big fort or trench and hiding in it!).

Tuesday 20 December 2011

Club Night 16th December

Although I have not got them painted yet we decided to risk the mockery of other club member and try out Hammerin' Iron. I umpired/learnt the rules while Luke and Steve concentrated on rolling dice. First of all we played a version of the demo game Martin runs at shows, tweaked to fit my vessels just to introduce them to the rules.

Once we had done this we leapt into a full game and it was great fun, even if I was mostly watching! Luke cunningly used his army support to bombard one of the objectives, while in the river his fleet engaged CSS Arkansas which fought long and hard and took a real pounding, but somehow was still afloat at the end of the game.

The union also took heavy losses, but managed a minor victory. This game really got me enthused again and I am keen to try and find the time to finish adding all the masts and details to the ships so I can then get on and paint them!

Club Night 9th December

I had finally arranged another Warhammer league game, this time against Colin and his dwarves. With a mass of warmachines and some favourable terrain it looked like it could be tricky. However some gods somewhere were on my side, warmachines misfired and destroyed themselves, thunderers could not hit, even before I used the chalice of dark rain and all my spells went off. Seeing my general under the influence of Mantle of Ghorok chucking out over 10 attacks was an awesome sight! I think my luck was confirmed when they finally killed my giant and for the dirst time ever he fell over on top of the unit he as fighting and took some of them with him

In the end I achieved a good victory and moved up the league table. Whether I can catch Duncan and his Daemons is another issue though.

Monday 5 December 2011

London Toy Soldier Show 3rd December

The London toy soldier was a very relaxed affair this year, although a little disjointed as we were not able to meet for our usual pre-show breakfast. After an initial wander round, we gathered back at the table Chris R had set up with one of his magnificent building in the centre and a cunning scenario and some clever little combat rules.

Having rigged the character selection Mike and I found ourselves on opposite sides as the main characters with other members playing our faithful companions/lackeys. We were both out to seek our claim to the widows fortune, and perhaps even her as well!

While I strolled forward with my faithful men (or at least down right rogues I thought I had paid enough to be loyal), Mike haughtily rode up to the inn with his man. One of his men read out a proclamation claiming his rights, which I rebuffed, and told Mike exactly what I thought of his honour and manhood!

He then retired around the corner of the inn and dismounted before coming back round. Now I thought something fishy was going on here (the giggling from the players was a clue), but challenged Mike none the less, knowing I was a far superior swordsman. As we drew blades I realised I had been conned and it was in fact one of him men posing as him, and renowned as a superior swordsman, but I had my honour and would not back down. And it turns out of greatly inflated reputation, our first clash of blades left me with a slight cut to my arm, but as we moved in again I ran him through much to my amazement and Mikes horror.

Meanwhile my men had dealt with Mikes other man and Mike had remounted, and despite my cries rode off, leaving me to claim the widow and her fortune, take Mikes man into my employee and generally be quite smug! It was a fantastic little game from Chris, fun, individual characters and nice and quick to giuve us time to look around the show, which Mike and I then did and I managed to pick up some cavalry for the start of my Duchy of Warsaw force for our Liepzig battles. 2013 will be the 200th anniversary so that give me plenty of time to prepare forces for a big game.

Above and below: Some example of Chris' beautiful figures

Club Night 2nd December

I finally had the opportunity to try out the Culps hill scenario I have played with the skirmish wargamers (see here). With a few players for each side I was excited to see how it played out with some very different players.

The game looked like it was off to a positive start with Steve K hurling a unit of Rebs straight into the Yankees on the hill. But then Steve's recent luck reappeared and he not only managed to lose the combat, but then break completely, losing a unit in the first turn!

And the game continued in this vein for the southerners. They could not get their commands going, or if they did they were losing combats or being out shot. The union right took a long time to get going and did look like it might get in trouble, but eventually out shot its opponent and when they charged it was decisive. The middle of the Union line waited until the Confederates were hard pressed on their right (the Union left) and began to make a remorseless advance across Spanglers meadow and on to Culps hill.

By now on the Southern right they had been pushed back off Culp's hill and although we ran out of time to complete the game (probably fortunately as Rick seemed to be suffering from a case of very bad jokes that evening and was in danger of getting lynched - McDougals brigade as the flour of the union army - and that was one of the good ones!), and also as the Confederates were getting pushed back and could just about argue they hadn't been defeated, but I suspect it was just a matter of time.

Above: The Union right, Below: The Union drive the Rebels off Culps hill
Above: The Confederate left, Below: The Union retake the defences

Sunday 27 November 2011

Club Night 25th November

Steve K and I dusted off his copy of Victory at Sea for some WW2 Naval combat. We decided for a change to pick fleets using the points system and play a standard scenario and see how it went. I continued my love affair with the Italians and took a battleship, a trio of cruisers and a destroyer squadron. Steve took the British and decided to try out a carrier, with some cruisers and destroyers in support.

Our game quickly focused on just one flank of the table, I think mainly as we were sitting nearer that end and wanted to keep our forces concentrated. I sent my destroyers steaming out ahead and tried to close to torpedo range. The first shots were exchanged to little effect. Meanwhile overhead my spotter plans were easily despatched by the massed British fighters and these then moved on to escort the torpedo bombers in.

By now my destroyers were in among it and the cruisers of both sides began to exchange fire, with the Italians having the better of it. The my Battleship came into action. In one massive salvo (with more 6's in one dice roll than I have see from my for quite a while), I changed the landscape of London, by sinking HMS Belfast. It then began to deteriorate for the British.

They lost another cruiser to combined gunfire and torpedo attack, and most of their destroyers were lost as well. I managed to weather the aircraft strike. This HMS Illustrious and a surviving destroyer against the majority of my battle fleet so they turned and fled, while I hunted down and sunk the last British cruiser.

A decisive victory for the Italians, with my Battleships opening salvo being almost as noticeable as yet another set of shocking dice rolls from Steve.

Warfare 19th Novemeber

Having finished my French Line I managed to get the scenarios written too and headed up to Warfare at Reading to join the rest of the Skirmish Wargamers for our Napoleonic extravaganza. With a 20 foot table we managed to fill it all with terrain and began to set up our troops. Between the group we have managed to amass quite a collection and can deploy quite substantial forces.

The first game for the Saturday was a typical fighting withdrawal that represented the early part of the campaign using a modified version of the Flames of War scenario.

Above: Beth commands the French left against the Russians, Below: Ted commanded the Austrians in the centre of the allied lines
Above: French forces deploy in front of the Prussian forces, Below: A view across the battlefield
Above: A view down the battlefield, Below: The French cavalry take advantage of a gap in the enemy lines and a great command roll.
Above: The allied cavalry moves to counter attack the French, Below: The French find themselves surrounded on the right flank
Below: French squares repel allied cavalry

The whole battle was hard fought. In the centre the Austrians made an early advance and took heavy casualties, but were the first brigade to withdraw from the battle. On the French right a single brigade found itself facing the entire Russian army. Despite the fact the heavy cavalry was being held in reserve the Russians fought hard, with even the Militia managing to hold off the French. When the heavy cavalry was released the poor French infantry's fate was sealed.

On the opposite flank the main attack was lined up against the Prussians, spearheaded by the Old Guard. While the extreme right of the Prussians held their positions, the right advanced to take on the French. This left a gap between the line the French cavalry ruthlessly exploited, riding down the Prussian artillery and forcing the infantry to form squares which were then pounded by the French artillery and Infantry. The Allied light cavalry counter attacked, but were chased off, one unit of French cavalry ending the game in possession of two enemy standards.

Despite this the French attack was simply not quick enough and the Allies held on till the end of the game to claim victory. It was hard work running a game this big in a noisy environment, but everyone seemed to enjoy themselves.

I was unable to make the Sunday, but they played the scenario I wrote based on Grossbeeren, and all accounts report that it was enjoyed again and the same French cavalry caused havoc again. And as an added bonus the group won best in show. For more photos see Mikes pictures here.

Sunday 20 November 2011

Painting Napoleonic French Line (Pic Heavy)

At Warfare the Skirmish Wargamers planned to run a very non-skirmish using black powder on a 20 foot long table set during the Liepzig campaign. I agreed to plan and umpire the games, but when I got the army lists I noticed there was no line infantry for the French and mentioned this to Mike who said "OK, I'll send you some, paint them!" I agreed, not really thinking through that this would mean I would have two weeks to complete them as well as plan the games and do all the resources to help make them run smoothly.

When the figures arrived from Mike the first thing that struck me was that they were Armies in Plastic (AIP) elite infantry, so were not line and all the officers were the same. The first job was to base them up (fortunately I had some spare bases), trim the epaulettes and plumes from my centre company figures and convert the officers. I decided for variety I would make each 12 man unit up of 6 2 man companies just like a real battalion, a Voltigeur, a grenadier and 4 line companies. They are not quite perfect as they still all carry hangers, but needs must and they are close enough.

Above and Below: Unpainted figures converted and based
Above: Converted officer, Below: Unpainted Tradition metal figure for regimental commander.
Above and Below: Figures sprayed grey primer and then white airbrushed on where appropriate
Above and Below: Coats painted below and paper flags tested out
Above: Red trim base coated, Below: Flesh, green and yellow base coat
Above and Below: Voltigeurs and Grenadiers highlighted and bases painted
Above and Below: More shots of the flank companies
Below: The centre companies bought up to the same standard as the flank companies
Above: The entire regiment of 3 battalions, Below: Command receives a coat of army painter
Above: The whole force covered with army painter and bases dry-brushed, Below: Matt varnish applied
Above: The completed force

Not too bad for 10 days work! Now it just remains to see how the 13eme Ligne perform on the battlefield.

Monday 7 November 2011

Club Sunday 6th November

We gathered up the club to play the finale in our Crusader campaign, but some events conspired and so we could not really proceed. Instead we threw together a quick total war game using the desert forces we had. Due to numbers I found myself on the Allied side so took a compact little Divisional Cavalry Squadron, to fight alongside an infantry company and a tank squadron against a Panzer company and a Bersaglieri battalion. Rather than recount all the details as lots happened I will just illustrate them with some photos.
Above: Initial deployment on the diagonal
Below: The Australian Cavalry dash into a depression and try to hold on against the Italians

Above: Another shot of the position in the depression
Below: German armour surrounds the Aussies, Grants arrive to the rescue and artillery continues to land in the depression
Above: German armour arrives behind the British artillery

At this point I got all caught up in the game and forgot to take any more pictures. It really broke down into two separate games. The fight around the depression had more armour from both sides thrown in and finding fire lines through the burning wrecks began to prove tricky and neither side really made any progress. On the other flank the German tanks caused problems behind the British lines, while in front of them the heavy Panzer IVs shelled the dug in infantry with their 75s, while staying at a range that the British anti-tank was ineffective. This gradual crumbling on the far flank eventually cost the Allies an extremely close game and I am keen to try some total war again in the future.

Saturday 5 November 2011

Club Night 4th November

Steve K and I decided to try out the 7TV rules from Crooked Dice that he had purchased at SELWG after seeing them at Salute. Now my youthful years means a lot of the 70's jokes I don't get, but I follow enough to get an idea of the intention of the game and so was looking forward to trying it out.

I naturally took the bad guys, an evil boss, his henchman and a series of faceless heavies against a smaller (and female dominated) band of heroes. We set up the terrain to be outside and distinctly Scottish by using a few of the buildings from the Border Reivers game the club put on a few years back to get a nice busy table.

The first game was a rescue as the good guys tried to rescue a prisoner from my crooks. But it stated going wrong for the good guys from the start, I ended up with more action tokens as well as having more men and was able to quickly bring my guys against a smaller part of the raiding force and mercilessly gunned them down, before switching against the other part of the force and gunning them down too. A dreadful start for the good guys and certainly not good for the ratings!

The second game was a more simple reconnaissance mission and the good guys made a better start, clearing a couple of the objectives and taking out a few of the bad guys, but then my SMG armed heavies came into action again and gunned down the good guys. It was so bad one of the good guys ran out into the open to shoot down my henchman, with all her skills and gadgets she just needed a 2+ to hit, promptly missed and then despite needing a lot more to hit her in return machine gunned her down.

Despite a ratings calamity with the good guys getting taken out twice, they are fun, clever rules and with some more figures and tweaking the forces should make for some more balanced games. We did a few things wrong (you can't aim an SMG, one of the good guys with the melee skills could infiltrate so avoiding running the gauntlet of the fire) and the limitations of the figures (way too any SMG armed bad guys, although it did cost points), they showed some real strengths and I can see them useful for many other, personality driven, episodic type games.

Wednesday 2 November 2011

Club 2nd November

Luke and I continued our desert themed axis of attack campaign, with my Italians forced to attack in a hold the line scenario. As a primarily foot force this was always going to be a tough ask. I decided to try and use smoke more effectively and plastered his artillery with guns and mortars to prevent them shooting as I tried to push forward as fast as possible, flanking him with my motorcilisti and L3's.

However this was not enough and under constant heavy fire my relatively immobile force just could not bring enough combat power to bear, quick enough to force the breakthrough and the Italians were thrown back and yet again the attack moved in neither direction.

Monday 24 October 2011

Club Night 21st October

Duncan and I finally got together to play some games of Malifaux, even if I had not managed to paint my stuff yet. It was very much a learning experience and the games were not especially quick and strewn with errors, but the second game we played was for me the highlight as I got some good tactics worked out and everything went quite well.

I managed to use Candy and her run away home ability to grab the objective and leg it and I also used the Dreamer for the first time, and although I will need to refine him a bit, found him easier to use than Pandora and very enjoyable. Using his I can fly ability to rush across the battlefield and then summon a teddy and Lord Chompy Bits straight into combat is some awesome alpha strike ability and makes the force feel very manoeuvrable which always suits my style of play.

SELWG, 16th October

SELWG has come and gone. I always enjoy this show, if nothing else since it was the first one that Luke and I went to over 15 years ago and it is good for a bit of nostalgia!

There seemed to be less game and more traders, which is good for shopping, but not so great for inspiration, which again I found sorely lacking. Again there was nothing that really grabbed my imagination, which is not to say there were not some good looking games, they just retrod the same old themes again, albeit very well.

There was one exception, I got a chance top play the new Hammerin' Iron rules from Peter Pig and will definitely be investing in them and some ships at Reading next month. I did some shopping, but it was not very exciting! Figure case galore! All from the excellent kaiser Rushforth range, I got case for my Helldorado, Malifaux, Blood Angels and nice little bag for my Dystopian wars. One of those not exciting but essential purchases, like paints and brushes.

Club Night 14th October

I played my second 40k league game against John-Paul and his Dark Hunter marines. It was an objective based mission with dawn of war deployment. The Dark Hunters had a mixed force, 3 scout squads (1 with sniper rifles), and a long range dreadnought (twin-linked lascannons and missile launchers), then 3 tactical squads and a standard assault cannon armed dreadnought all in drop pods and a squad of terminators. The force was finished off with a pair of land-speeders, a pair of whirlwinds and a chaplain to lead them.

The sniper scouts started on table and John-Paul took the first turn landing two tactical squads right over deep in to my table edge with the land speeders sweeping forward to support them. I bought my assault squads on, one attacking the marines in the centre and one beginning to flank the enemy.

A viscous close combat developed in the centre with my assault squad eventually re-enforced by some death company against tactical squads and some terminators. I was eventually defeated but had inflicted heavy casualties on my opponent.

On my right flank I found my flanking squad caught up with the drop-pod landed terminator in a prolonged combat as I failed to defeat it. However the death company with the Chaplain who had dropped in to support them were attacked by a scout squad they quickly dispatched and they moved off to support the attack on the enemies rear.

I dropped the veterans into the enemy centre and saw off my opponent and hurried to try and attack the snipers, but had to go to support the the final assault squad. This combat finally swung against me and the game ended with the objective on my table edge not held by anyone, the objective on the left also not held by anyone as I was still unable to defeat the dreadnought and move to take it, while the objective on the Dark Hunters table side was held by the scouts and my surviving marines in the combat on the far side were too far to contest it so I suffered a defeat after a close, enjoyable game.

Saturday 15 October 2011

Club Night 12th October

Luke and I headed up the club for mid-week game and decided to start an early war axis of attack campaign, with Luke using a Jock Column force and me using a Bersaglieri company. Our first battle was the Jock column attempting a breakthrough. Luke made a brave gamble by keeping his infantry as part of the flanking force and committing just his armour and artillery to the main attack. I used my numbers to surround him as best as possible and keep my armour in reserve.
I used my reconnaissance move to hurry my motociclisti into the town to my rear and occupy it ready to repel the flank attack
Luke through his armour at my forces, but a combination of 47mm gun fire and the amazing pluck of my fearless conscripts in the front line they defeated the first attack.
I then began to hammer the artillery with air power and my own artillery. By now my reserves had started to arrive, but the other element of the jock column appeared to be lost in the desert.
I even was able to launch my tankettes (my new favourite unit along with the mid-war L6 light tanks) against the 25 pounder battery. This proved the last straw and the battered attackers broke.
So the Bersaglieri had been victorious and are now on the attack and ready to push forward to Egypt.

After this shorter than expected game I tried to introduce Luke to Malifaux with a basic game. He took my Lady Justice crew and I tried out Pandora for the first time. And she is touch to play. Initially I seemed to have the edge with my multiple moves and distance spells, but once I got in too close Lady J and her Marshalls did what they do best and dispatched my physically weaker crew with ease.